Battery switch on travel trailer function is crucial for managing your RV’s power. Understanding how your battery switch works is key to preventing dead batteries and ensuring a smooth camping experience. This guide dives into the different types of switches, their functionality, troubleshooting tips, and essential safety precautions, equipping you to confidently handle your travel trailer’s electrical system.
We’ll explore everything from single-pole to double-pole double-throw switches, detailing their wiring and the advantages and disadvantages of each. We’ll also cover common issues like corrosion and loose connections, providing step-by-step solutions to get you back on the road. Learn how the battery switch interacts with your converter, inverter, and solar panels for optimal power management.
Battery Switch Types in Travel Trailers
Choosing the right battery switch for your travel trailer is crucial for managing your power sources and preventing electrical issues. Understanding the different types available and their functionalities will help you make an informed decision. This section will detail the common types, their pros and cons, and typical wiring configurations.
Single-Pole Battery Switches
Single-pole battery switches are the simplest type. They control the power flow from a single battery to a single load (like your trailer’s lights or appliances). They’re typically used in smaller trailers with a single 12V battery. These switches are often found in older models or as a simple on/off solution. The wiring is straightforward: one wire from the battery’s positive terminal, one to the load, and the ground connection remains separate.
The switch acts as a simple break in the positive circuit.
Double-Pole Battery Switches
Double-pole switches offer more control. They allow you to disconnect both the positive and negative terminals of your battery simultaneously. This is a significant safety feature, completely isolating the battery from the trailer’s electrical system. This added safety prevents accidental shorts and protects against potential electrical hazards during maintenance or repairs. The wiring involves connecting both the positive and negative battery cables to the switch, which then connects to the trailer’s electrical system.
Double-Pole Double-Throw (DPDT) Battery Switches
DPDT switches are the most versatile option. They allow you to switch between two separate battery banks (e.g., a house battery and a starting battery) or even connect to shore power. This setup allows you to use either battery bank independently or both simultaneously. The wiring is more complex, requiring careful attention to detail and understanding of the switch’s configuration.
Incorrect wiring can lead to electrical problems or damage. A typical setup involves the switch controlling the positive and negative cables from both battery banks and routing them to the trailer’s electrical system. You might also incorporate a connection for shore power.
Comparison of Battery Switch Types
| Switch Type | Number of Batteries Controlled | Safety Features | Complexity |
|---|---|---|---|
| Single-Pole | One | Low | Low |
| Double-Pole | One | High (complete isolation) | Medium |
| Double-Pole Double-Throw (DPDT) | Two or more | Medium (depending on configuration) | High |
Function of the Battery Switch
The battery switch in your travel trailer is a crucial component of its electrical system, acting as a central on/off control for your house batteries. It’s a simple but vital device that safeguards your batteries and prevents unwanted drain, ensuring your RV is ready to go when you are. Think of it as a master power switch specifically for your house batteries, separate from your vehicle’s starting battery.The primary function of the battery switch is to isolate the house batteries (which power your lights, appliances, and other 12V systems) from the chassis battery (which starts your tow vehicle).
This isolation is essential for several reasons. The switch allows you to completely disconnect the house batteries when the trailer is not in use, thereby preventing parasitic drain—a slow, constant discharge caused by small electrical draws from things like clocks, smoke detectors, or even poorly insulated wiring.
Battery Isolation and Parasitic Drain Prevention
The battery switch achieves isolation by physically breaking the electrical connection between the house batteries and the rest of the trailer’s electrical system. When the switch is turned to the “off” position, no power flows from the house batteries, preventing any drain, even from devices with very low power consumption. This is particularly important for extended periods of storage or when you’re not using your travel trailer for several weeks or months.
Leaving the switch on could lead to a completely discharged battery, rendering your RV unusable and potentially causing damage to the batteries themselves.
Safety Implications of a Malfunctioning Battery Switch
A malfunctioning battery switch can present several safety hazards. A switch that fails in the “on” position could lead to a completely drained house battery, leaving you without power when you need it. Conversely, a switch that fails in the “off” position might not completely disconnect the house batteries, still allowing for parasitic drain and potential damage. In some cases, a faulty switch could even create a short circuit, potentially causing overheating, fire, or other electrical damage.
Regularly checking your battery switch for proper operation and ensuring it’s properly switched off when not in use is a critical part of RV maintenance.
Troubleshooting Common Battery Switch Issues: Battery Switch On Travel Trailer Function

Your travel trailer’s battery switch is a crucial component, connecting your house batteries to the trailer’s electrical system. Problems with this switch can leave you stranded without power, so understanding common issues and troubleshooting steps is essential. This section will guide you through identifying and resolving typical battery switch malfunctions.
Common Battery Switch Problems
Several factors can lead to a malfunctioning battery switch. Corrosion is a frequent culprit, building up on the terminals and hindering the flow of electricity. Loose connections, caused by vibration or improper installation, can also interrupt the circuit. Finally, internal failure within the switch itself can occur due to age, wear, and tear, or excessive current draw.
These problems manifest in various ways, from a complete lack of power to intermittent electrical issues.
Troubleshooting a Non-Functional Battery Switch
Let’s walk through a systematic approach to troubleshooting. First, visually inspect the switch for obvious signs of damage or corrosion. Look closely at the terminals and connections for any signs of green or white powdery residue.
- Check the Connections: Carefully examine all connections to the battery switch. Tighten any loose bolts or nuts. If you find corrosion, proceed to the cleaning steps Artikeld below.
- Test the Switch: Use a multimeter to check the continuity of the switch. Set the multimeter to the ohms setting and test between the input and output terminals. A reading close to zero ohms indicates a good connection. A high resistance reading or an open circuit suggests a problem within the switch itself.
- Verify Battery Power: Ensure your house batteries are properly charged and have sufficient voltage. A low battery voltage will prevent the switch from working correctly, even if the switch itself is fine. Use a multimeter to check the voltage at the battery terminals.
- Inspect Wiring: Trace the wiring from the switch to the batteries and to the trailer’s electrical system. Look for any broken or damaged wires, loose connections, or signs of rodent damage.
Cleaning and Maintaining Your Battery Switch
Regular cleaning and maintenance can significantly extend the life of your battery switch and prevent future problems.
- Disconnect the Battery: Before starting any cleaning, always disconnect the negative terminal of your house batteries to prevent accidental shocks or short circuits.
- Remove Corrosion: Use a wire brush or a battery terminal cleaner to carefully remove any corrosion from the terminals and connections. A baking soda and water paste can also be effective.
- Apply Protective Coating: After cleaning, apply a dielectric grease or a corrosion inhibitor to the terminals and connections. This helps prevent future corrosion buildup.
- Tighten Connections: Ensure all connections are securely tightened. Avoid over-tightening, which could damage the terminals.
- Regular Inspection: Visually inspect your battery switch at least once a year, or more frequently if you use your trailer extensively in harsh conditions.
Troubleshooting Flowchart
Imagine a flowchart. It would start with “Battery Switch Not Working?”. The first branch would be “Visual Inspection (Corrosion/Loose Connections)?”. If yes, proceed to “Clean and Tighten Connections”. If no, the next branch would be “Multimeter Test (Continuity)?”.
A positive result leads to “Check Battery Voltage and Wiring”. A negative result indicates “Internal Switch Failure – Replace Switch”. Each step would have a decision point leading to the next action, ultimately guiding you to the solution.
Battery Switch Installation and Replacement
Installing or replacing a battery switch in your travel trailer might seem daunting, but with the right tools and a methodical approach, it’s a manageable DIY project. This section details the process for various switch types, highlighting key differences and potential challenges. Remember to always disconnect the battery’s negative terminal before starting any electrical work to prevent accidental shocks or short circuits.
The installation process generally involves disconnecting the existing switch, carefully noting the wiring configuration, installing the new switch in the same location (or a new one if needed), and then reconnecting the wires according to the new switch’s specifications. The complexity increases with the type of switch and the existing wiring setup.
Tools and Materials
Gathering the necessary tools and materials beforehand will streamline the installation process. Having everything ready prevents interruptions and ensures a smooth workflow.
So, you’re an audiophile who loves to travel? Awesome! Setting up your sound on the go can be tricky, but totally doable. Check out this guide on audiophile travel aetup for tips on packing your gear without sacrificing sound quality. Then, if you’re planning a more adventurous trip, maybe something involving mountains, consider the advice given in this other resource on audiophile travel aetup – it focuses on more rugged environments and how to protect your precious equipment.
Remember, good sound doesn’t have to stay home!
- New battery switch (choose the appropriate type for your needs)
- Wire strippers/cutters
- Crimping tool (if using crimp connectors)
- Screwdrivers (Phillips and flathead)
- Wire nuts or crimp connectors
- Electrical tape
- Voltmeter (for testing connections)
- Drill (if needed for mounting)
- Safety glasses
- Gloves
Installing a Standard Rotary Battery Switch
Rotary switches are common in travel trailers due to their simplicity and reliability. The installation involves a straightforward process of connecting the positive (+) cables from the battery and the trailer’s electrical system to the appropriate terminals on the switch.
Diagram: Imagine a rotary switch with three positions: OFF, Battery, and Battery + Shore Power. The positive cable from the battery connects to the input terminal. A second cable runs from the switch’s Battery terminal to the trailer’s main power distribution panel. A third cable runs from the switch’s Battery + Shore Power terminal to the shore power input.
Finally, a cable runs from the distribution panel to the battery’s negative (-) terminal. This ensures power flows correctly depending on the switch position.
So, you’re an audiophile who loves to travel? Awesome! Planning your next trip? Don’t forget your tunes! Check out this guide on building the perfect audiophile travel setup for those tropical getaways. But if you’re more of a mountain person, you’ll need something rugged and reliable; consider these tips for a killer audiophile travel setup for your next climbing expedition.
Remember, good sound doesn’t have to stay at home!
Installing a Perko Battery Switch
Perko switches, known for their robust construction and multiple battery configurations, are more complex to install. They typically have more terminals and require careful wiring to handle multiple batteries and power sources.
Diagram: A Perko switch might have terminals for multiple batteries (Battery 1, Battery 2), a combined output, and a shore power input. Each battery’s positive (+) cable connects to its respective terminal. The combined output terminal feeds the trailer’s electrical system. The shore power input connects to its designated terminal. A common negative (-) bus bar connects all batteries’ negative terminals.
Comparing Installation Processes
While the basic principles remain consistent—disconnect, note, connect—the complexity varies. Rotary switches are generally easier to install due to their simpler design. Perko switches, with their multiple terminals and configurations, demand more careful planning and wiring. Always consult the specific switch’s wiring diagram for accurate connection.
Troubleshooting Installation Issues
Common problems include incorrect wiring, loose connections, and faulty switches. Using a voltmeter to test the voltage at various points in the circuit helps identify the source of the problem. If the switch is faulty, replace it with a new one of the same type or an upgrade, ensuring proper wiring according to the new switch’s instructions.
Battery Switch and Electrical System Integration
The battery switch is the central control point for your travel trailer’s 12-volt DC system, acting as a gatekeeper for power flow. Understanding its interaction with other electrical components is crucial for safe and efficient operation. This section details how the battery switch works in conjunction with the converter, inverter, and solar panels, influencing both charging and discharging processes, and ultimately impacting the power available to your trailer’s appliances and lights.The battery switch’s primary function is to isolate the house batteries from the rest of the electrical system.
This prevents unwanted battery drain when the trailer isn’t in use and protects the batteries from potential overloads. However, its role extends far beyond simple on/off functionality; it significantly impacts how power flows throughout the trailer.
Battery Switch and Converter Interaction
The converter is responsible for converting 120-volt AC power (from a campsite hookup or generator) into 12-volt DC power to charge your batteries. With the battery switch in the “on” position, the converter charges the batteries. When the switch is off, the converter still receives AC power, but it won’t charge the batteries, preventing wasted energy. In some systems, a dedicated charging circuit might bypass the battery switch, allowing continuous charging even when the switch is off.
This is often the case with newer trailers featuring smart charging systems.
Battery Switch and Inverter Interaction
The inverter converts 12-volt DC power from your batteries into 120-volt AC power, allowing you to run AC appliances. The battery switch acts as a safety mechanism here. When the switch is “off,” the inverter won’t have access to the batteries, preventing accidental discharge and protecting your batteries from potential damage. Conversely, when the switch is “on,” the inverter can draw power directly from the batteries to supply AC power to your appliances.
Battery Switch and Solar Panel Interaction
Solar panels generate DC power, and this power typically charges the batteries. The interaction with the battery switch depends on the system’s design. In some systems, the solar charge controller will charge the batteries regardless of the battery switch’s position, providing a continuous charging source even when the main switch is off. In other systems, the solar charge controller might be wired through the battery switch, meaning the solar panels will only charge the batteries when the switch is “on.”
Battery Switch and Electrical Loads
The battery switch controls the flow of power to all 12-volt DC loads in the trailer, including lights, water pumps, and refrigerators (if they run on DC). When the switch is off, these loads are completely disconnected from the batteries, preventing any drain. Turning the switch “on” connects these loads, allowing them to draw power directly from the batteries.
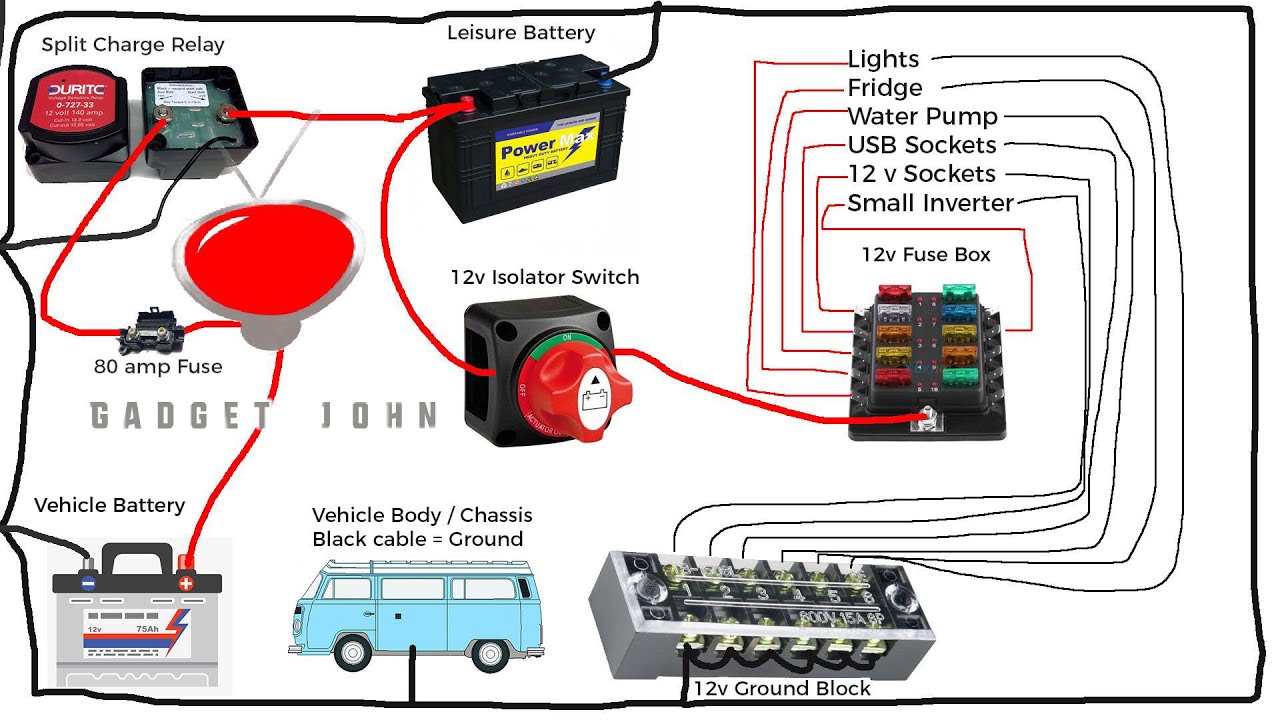
Diagram of Travel Trailer Electrical System, Battery switch on travel trailer function
Imagine a diagram. At the top, we have the solar panels, connected to a solar charge controller. The controller is then wired to the house batteries. From the batteries, we have two main paths. One path leads to the battery switch.
The other path, often a dedicated charging circuit, connects directly to the converter. From the battery switch, several lines branch out. One line goes to the inverter, which then supplies AC power to the AC outlets. Another set of lines connects to various 12V DC loads throughout the trailer, such as lights, the water pump, and a 12V refrigerator.
The battery switch acts as the central control point, allowing you to disconnect all these loads simultaneously. The converter, even when the switch is off, continues to receive AC power and can charge the batteries through the dedicated charging circuit, maintaining a charge even when the trailer isn’t in use.
Safety Precautions When Working with Battery Switches
Working with your travel trailer’s battery system involves potential hazards related to electricity and corrosive battery acid. Taking proper safety precautions is crucial to prevent injury and damage to your equipment. This section Artikels essential safety measures to ensure a safe and successful experience when working with your battery switch.
Improper handling of battery switches and related electrical components can lead to serious consequences, including electric shock, burns, explosions, and damage to your trailer’s electrical system. Incorrect wiring can cause short circuits, resulting in fires or damage to your batteries and other electrical components. Always treat battery systems with respect and follow established safety protocols.
Disconnecting and Reconnecting the Battery Switch Safely
Before working on any part of your trailer’s electrical system, including the battery switch, always disconnect the negative (-) battery cable first. This prevents accidental short circuits and reduces the risk of electrical shock. Use a wrench or pliers appropriate for the battery terminal size. After disconnecting the negative cable, you can then disconnect the positive (+) cable.
When reconnecting, reverse the process, connecting the positive cable first, followed by the negative cable. Ensure all connections are tight and secure.
Using Appropriate Personal Protective Equipment (PPE)
Working with batteries and electrical systems requires the use of appropriate personal protective equipment (PPE). This includes safety glasses or goggles to protect your eyes from splashing battery acid or sparks, gloves to protect your hands from acid and potential electrical shocks, and closed-toe shoes to protect your feet. A respirator might also be advisable when working in confined spaces or if you’re concerned about battery fumes.
Never work on your battery system while wearing loose clothing or jewelry that could get caught in moving parts or conduct electricity.
Risks of Incorrect Wiring or Handling
Incorrect wiring of the battery switch can create several dangerous situations. A reversed connection (connecting the positive cable to the negative terminal and vice-versa) can immediately create a short circuit, potentially causing sparks, overheating, and even a fire. Loose connections can lead to overheating, corrosion, and potential fire hazards. Improperly secured wires can also create short circuits or become a tripping hazard.
Always double-check your wiring against the wiring diagram provided by the manufacturer of your battery switch or trailer.
Mastering your travel trailer’s battery switch is a vital skill for any RV owner. By understanding its function, troubleshooting potential problems, and following proper safety procedures, you can ensure reliable power and prevent costly repairs. Remember to regularly inspect your switch for corrosion and loose connections – a little preventative maintenance goes a long way toward a worry-free camping adventure!
FAQ Overview
What happens if my battery switch is left in the “off” position?
Leaving the switch off completely disconnects your house batteries from the rest of the electrical system. This prevents any drain on your batteries, but also means no power to your appliances.
Can I use a different type of battery switch than what came with my trailer?
Potentially, but ensure the new switch has the correct amperage rating and wiring configuration for your system. Improper replacement could damage your electrical system.
How often should I clean my battery switch?
At least once a year, or more often if you notice corrosion or performance issues. A clean switch ensures optimal electrical conductivity and prevents problems.
My battery switch is making a clicking sound. What’s wrong?
This often indicates a loose connection or internal failure. Inspect the wiring and connections carefully. If the problem persists, professional help may be needed.
